
Hi there! You’re here because you need to remove your ceiling light cover, probably to replace the lightbulbs or to clean the glass.
If it has a screw, unscrew the middle point while holding onto the glass dome. If it has no screws, turn the whole dome to unscrew it. For a light cover with clips, hold the glass dome and remove the loose clip first, then remove the glass dome. For a can light cover, gently pull down or use a spackle knife to remove the entire cover then pinch the wires to remove it completely. For a fluorescent light cover, push the rectangle up and pull out slightly to get it over the lip. If it’s in a drop ceiling, pull down the metal clasps along the sides and the light cover will swing open.
When I started researching this myself, I discovered that the information was a bit spotty, and not very well organized.
So, for your benefit (and my future reference), I’ve put together this guide showing how to remove the light covers from 6 of the most common types of light fixtures. Let’s jump in!
Table of Contents
How to Remove Light Covers that Have a Screw
This is the type of light fixture we have in our apartment, so I’ll start with that. Check out the brief video I made below, demonstrating the steps:
Alright, now let’s break this down into steps:
1. Get a Sturdy Step Ladder, Stool, etc.
Unless you’re Shaquille O’Neal, then you’ll want something to stand on so you can reach the light cover.
A stepping stool or small self-standing ladder would be ideal. I don’t have either of those on hand at the moment, so I’ve used a sturdy chair.
2. Consider Wearing Gloves
To help with traction, or to keep your hands protected and clean, you may want to wear gloves to help you remove the glass cover.
For example, you could use some of those mechanic gloves, or gardening gloves to give yourself some extra traction.
I haven’t done this in my video above, because my light cover seems fairly clean and not too rough, but you might have something different to deal with.
3. Hold the Glass with One Hand
Now, this is very important. Before you unscrew the knob that holds the glass cover in place, make sure you hold the glass with one hand. Otherwise, the glass cover might fall straight off the ceiling, and hit you or shatter on the floor. Not good.
4. Unscrew the Knob with Your Other Hand
With the glass held in place, you can now begin unscrewing the knob with your other hand.
I’m right-handed, so I’ve held the glass with my weak hand (left hand), and I’m unscrewing the knob with my strong hand (right hand).
5. Once the Knob is Free Look for a Washer
There may or may knot be a washer under the knob that holds the glass in place. If the glass cover is not loose after you’ve taken the knob off, check for a washer that could be holding the glass in place.
If you find one, remove it.
6. Remove the Glass Cover
Now that you have the knob and (possibly) the washer removed, you can now gently pull the glass cover off of the ceiling mount.
You really shouldn’t have to pull or put much pressure on it, it will probably already be resting free in your hands.
You did it! Once, you have the glass off, you can move on to replacing the old bulb, cleaning out the glass, or both.
How to Remove Light Covers Without Screws
Now, if you have a light cover without screws (e.g. without a knob), then you’ll need to handle things a bit differently.
I don’t currently have this type of light cover in my home, but I found a helpful video from Steve DeThample on YouTube that helpfully illustrates the process:
You’ll notice that the steps are pretty similar here but with a few important changes. Let’s briefly run through the full process so everything is clear:
1. Get a Sturdy Step Ladder, Stool, etc.
You’ll still need this unless you’re crazy tall. A stepping ladder or sturdy stool will do fine.
2. Consider Wearing Gloves
Steve has done this in the video above, and I think it would be especially important for this type of light cover because you need to give yourself some traction against the glass to get it to rotate.
3. Hold the Glass with Both Hands
There’s no knob to turn for this type of glass cover, and you’ll need all the traction you can get, to make rotating the cover easier.
So, put both hands on the glass cover (on sides opposite of each other).
4. Rotate Left (Counter Clockwise)
Then, you’ll want to rotate the glass cover left (lefty-loosey) or counterclockwise. This will remove the glass dome from the metal ring.
5. If Stuck, Lightly Bump with a Shoe
Steve mentioned this as well, and I would have never thought of this, but it seems like a great “hack” that fixed the problem of the light cover getting stuck.
I can imagine a cover like this, which may sit unmoved for years, becoming stuck or sticking in place. So, if you run into that problem, consider lightly hitting the cover with the rubber side of a shoe to get it to loosen up.
Don’t go crazy though, it is glass, after all, so be careful not to hit it so hard that it breaks!
6. Remove the Glass Cover
Once you’ve got the cover loose and unscrewed, you can gently lift the glass cover away from the ceiling.
From there, you’re ready to change the bulbs and get on with your life 🙂
How to Remove Light Covers With Clips
The next type of light cover we’re going to cover is those covers that are held in place with metal clips. Here’s a good video from Theoverengineer that shows how to do it.
Some of the basics are going to be the same, but there are a few nuances that are unique for this type of light cover. Let’s dive in!
1. Get a Sturdy Step Ladder, Stool, etc.
Yup – you’ve got to have something to help you reach the light. Make sure it’s sturdy, and won’t wobble underneath you.
2. Consider Wearing Gloves
Wearing gloves is an easy way to protect yourself during any project. But these small clips can have sharp edges so it’s especially important to wear gloves.
Gardening gloves or mechanic gloves would both work well for this.
3. Hold the Glass with One Hand
Once you free the glass from the clips, you won’t want it to fall, so make sure you hold the glass cover in place.
4. Find the “Loose” Clip and Pull Out
One of the clips should be “loose”, meaning that it can be moved out away from the glass.
So, first, you’ll need to identify which of the clips are movable.
Then, once you’ve found it, use those hand muscles and pull the cover clip firmly (but still gently) away from the glass cover.
5. Firmly, but Gently, Pull the Glass Out
When you get the clip moved far enough, you should be able to pull the glass cover out from under the clip, freeing it from the ceiling mount.
From there, you should be able to change the bulbs, clean out the glass, or whatever else you need to do. To replace the glass cover, you just reverse the process.
How to Remove Can Ceiling Light Cover
This type of light cover is also called a flush mount fixture and they are pretty common as bathroom ceiling light covers because they completely seal in the light and any electrical wires.
Unfortunately, I don’t have any of these to be able to show you how it’s done, but BJ Poznecki can show you exactly how it’s done.
Here’s a step by step break down to reinforce what they went over in the video.
1. Gather Materials
For this type of ceiling light, you’ll need a few extra materials before you jump in.
- Gloves
- Step stool
- Putty knife or utility knife
This type of light cover might be stuck to your ceiling, for that reason you might need a utility knife to unstick it.
2. Loosen Light Fixture
Before you do anything else, try to pull down the light cover with just your fingers, if it comes out then you can skip to the next step.
If your light fixture is stuck, you’ll need to work around the outside of it with either a putty knife or utility knife to get it unstuck.
Be careful when you’re doing this because you don’t want to accidentally cut any wires. Have your utility knife only stick out a tiny amount to avoid any hazards.
To be extra careful, you can always turn off the breaker for those lights.
3. Pull Down Light Cover
Now that it’s loosened up, pull down the light cover. It should be attached by a wire spring clip.
4. Remove Cover Completely
To remove the cover completely, pinch the spring clip together and it will slide out of the attachment.
Do this with the wire on the other side and your light cover will be free for cleaning and replacement.
How to Remove Fluorescent Light Covers
This type of light cover is deceptively easy to remove. I don’t have this type of cover in my home but here’s a good video that shows how to do it step by step.
This may be the simplest ceiling light cover to remove, all you need is a ladder to reach the light.
Once you’re close to the light, push the plastic ceiling light cover up and then gently pull outwards to get the plastic lip around the ledge it’s sitting on.
Now, your light cover should easily swing off the other side.
To put it back, hook one side on the lip and swing it closed, pull the remaining lip out slightly, lift it over the lip, and release it.
Easy, peasy, lemon squeezy.
How to Remove Fluorescent Light Cover in a Drop Ceiling
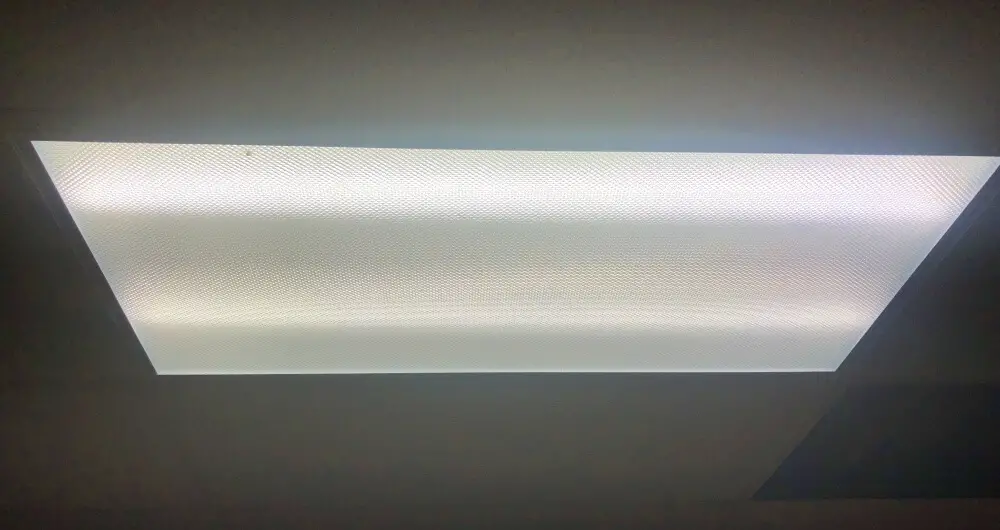
This type of ceiling light fixture is more common in industrial or business settings, but you could, like me, have it in your home as well.
But, don’t let it intimidate you, the removal process for these types of light covers is actually pretty easy.
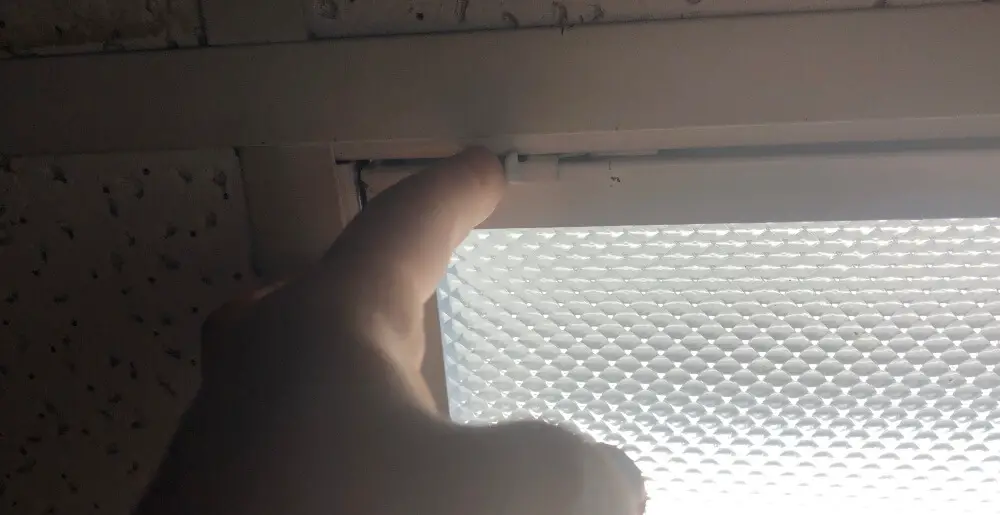
1. Gather Tools
For this type of light cover, you’ll need to grab a couple of tools but they’re common and you probably already have them.
- Step ladder or stool
- Flat head screwdriver or putty knife
- Gloves (recommended)
Once you’ve got the necessary tools and you’re ready to go, here’s how you remove the light cover.
2. Pull Down Clasps
Drop ceiling light covers are attached with metal clasps that flip up into the cover. To remove the light cover, swing the clasp down to detach it from the light.
If it’s stuck, use your screwdriver or putty knife and slide it under the clasp to get leverage. Mine were loose so I just did it with my fingers.
Then pull down the clasps to detach the light cover.
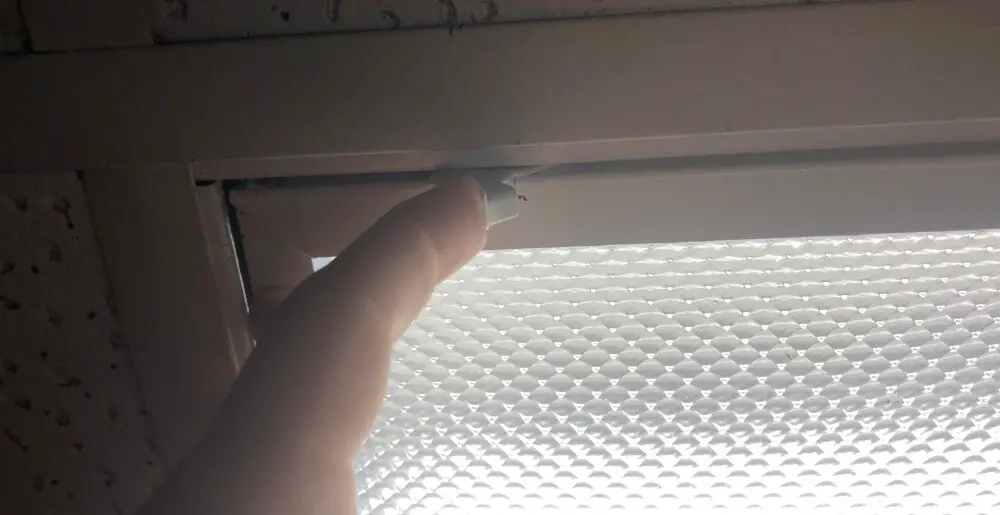
Be careful when you remove the last light cover on one side because the light fixture might swing open which could be dangerous when you’re standing on a ladder.
3. Remove the Cover Completely
Once the clasps are undone, simply pull the cover off the other side, there are only clasps on one side.
Tada! You’ve got your drop ceiling light cover removed, now you can clean, replace, or do whatever you need to do with it.
When to Call Professional Help
Trying to do things on your own is great, but sometimes you should still call a professional for help. Here are some times you should consider calling a professional.
- Any technical electrical wiring needs done (unless you are a professional electrician)
- The light cover doesn’t come out easily (don’t force it and risk breaking something)
- Can’t safely reach the light, don’t risk falling
- Any time you feel uncomfortable with the task
These are just some guidelines and as the last one says, if you ever feel uncomfortable about what you’re doing, don’t hesitate to call a professional to help you out.
